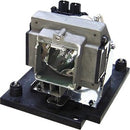
Description
Discover a trusted replacement projector lamp crafted to restore the sharp, vibrant projection of your Sharp XG-PH50X. The BTI AN-PH50LP2-BTI Projector Lamp is designed to fit the right-lamp position precisely, delivering consistent brightness and accurate color across extended viewing sessions. Engineered as an OEM-equivalent to the AN-PH50LP2, this lamp offers a reliable swap that minimizes downtime and preserves image quality, so classrooms, meeting spaces, and home theaters can resume delivering engaging presentations and immersive entertainment without compromise. Whether you’re updating an aging projector in a busy classroom or refreshing a home cinema setup, this BTI lamp provides a durable, high-performance replacement that partners seamlessly with Sharp’s projection system. By choosing a lamp built for compatibility, you’re ensuring a smooth installation experience, dependable operation, and steadier performance over the long term.
- Replacement projector lamp for Sharp XG-PH50X (right position): This BTI lamp is purpose-built to fit the right-lamp port on the Sharp XG-PH50X, restoring brightness and color fidelity while maintaining the projector’s original imaging characteristics. It’s designed to align with the projector’s housing and connector geometry to provide a straightforward swap that minimizes downtime and confusion during maintenance or upgrades.
- OEM-equivalent performance for AN-PH50LP2: The BTI AN-PH50LP2-BTI is engineered to mirror the performance profile of the original AN-PH50LP2, delivering dependable lamp life, color stability, and consistent light output. Expect reliable operation that supports clear, detailed images, sharp text rendering in presentations, and vivid media playback across a variety of content with minimal color shift over time.
- Reliable brightness and color accuracy: Replacing an aging lamp helps preserve the projector’s image quality, ensuring scenes retain their intended brightness and contrast. This lamp is built to sustain uniform illumination and stable color temperature, so slides, videos, and graphics appear with the clarity and accuracy audiences expect.
- Easy installation and compatibility: Designed for straightforward replacement in the XG-PH50X model, the BTI lamp reduces installation complexity. The right-lamp configuration aligns with the original assembly, making a host of maintenance tasks quicker and safer, while preserving the projector’s built-in protection and cooling design.
- Durable build for frequent use: Whether in classrooms, corporate spaces, or home theaters, this lamp is crafted to handle frequent use with dependable performance. The BTI unit emphasizes stable output and robust construction to withstand routine handling during replacements, reducing the risk of premature failure and downtime.
Technical Details of BTI AN-PH50LP2-BTI Projector Lamp
- Part compatibility: AN-PH50LP2 (replacement for this model)
- Compatibility: Sharp XG-PH50X projector (right lamp position)
- Brand: BTI
- Type: Projector lamp module (replacement)
- Design intent: OEM-equivalent performance for reliable imaging
How to Install BTI AN-PH50LP2-BTI Projector Lamp
Step 1 — Power down and cool: Turn off the projector and unplug it from power. Allow the unit to cool completely before attempting any lamp replacement, as the internal components reach high temperatures during operation.
Step 2 — Access the lamp housing: Remove the projector cover according to the manufacturer’s instructions. Carefully locate the lamp housing, which is typically secured with screws or a retainer clip designed for easy access on the right-lamp side of the model.
Step 3 — Remove the old lamp: Unscrew or disengage the lamp housing fasteners, then gently pull the old lamp straight out of the connector. Handle the lamp by the housing and avoid touching the glass surface, which can reduce lamp life and image quality.
Step 4 — Install the new lamp: Align the new BTI AN-PH50LP2-BTI lamp with the connector and slide it into place. Secure the housing with the original screws or fasteners, ensuring a snug, vibration-free fit.
Step 5 — Reset lamp timer and reassemble: Replace the projector cover. Reconnect power and turn the projector on. If prompted, reset the lamp usage timer according to the user’s manual to track lamp life accurately and maintain optimal projector performance.
Step 6 — Test the image: Run a brief test pattern or a short video to verify brightness, color consistency, and uniform illumination across the screen. If you notice uneven brightness or color shifts, recheck the lamp seating and connectors.
Frequently asked questions
Is this lamp compatible with Sharp XG-PH50X?
Yes. The BTI AN-PH50LP2-BTI is designed as a replacement for the AN-PH50LP2 and is compatible with Sharp XG-PH50X in the right lamp position. This makes it a suitable choice for replacing aging components without altering the projector’s optical path or control electronics.
What does OEM-equivalent mean for this lamp?
OEM-equivalent means the BTI lamp is engineered to match the performance characteristics of the original part, including brightness, color stability, and electrical compatibility. It’s built to provide similar imaging quality and reliability to the factory lamp while offering an alternative source for replacement parts.
Can I replace the lamp myself, or should I hire a technician?
In most cases, replacing a projector lamp is a user-serviceable task that can be completed by following the manufacturer’s instructions and safety precautions. If you’re comfortable with basic electronics and power tools, you can perform the replacement using the steps outlined above. If you have any doubts or if your projector requires special handling, consulting a technician is advised.
How can I ensure longevity and safe use of this lamp?
To maximize lamp life and ensure safe operation: handle the lamp carefully, avoid touching the glass, keep the projector in a clean environment with proper ventilation, and replace the lamp promptly when brightness begins to fade or image quality degrades. Regular maintenance, including dust management and periodic firmware checks, supports consistent performance.
What should I do if the projector won’t power on after installation?
Ensure the lamp is seated correctly in the connector and that all fasteners are tightened securely. Verify the lens and filter are properly installed, and confirm the power supply and on/off controls. If the issue persists, consult the projector’s user manual for troubleshooting steps or contact customer support for guidance.
Customer reviews
Showing - Of Reviews


