Description
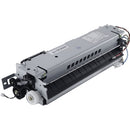
The Dell 110V Fuser is the essential replacement part you need to restore peak performance to your Dell monochrome laser printers. Specifically designed for the B2360d, B2360dn, B3460dn, B3465dn, and B3465dnf models, this fuser unit ensures reliable fusing, crisp text, and consistent print quality from the first page to the last. If you’ve noticed ghosting, smudging, or uneven toner adhesion, a genuine Dell 110V fuser can restore the depth, contrast, and professional finish your documents demand. Engineered to meet Dell’s exacting standards, this replacement part minimizes downtime, reduces waste, and keeps your workflow flowing smoothly in busy home offices, small businesses, or print rooms that rely on fast, dependable output.
- OEM-grade compatibility and fit: Specifically engineered for Dell B2360d, B2360dn, B3460dn, B3465dn, and B3465dnf printers, guaranteeing a precise fit and reliable operation without the guesswork of aftermarket parts.
- Enhanced print quality and consistency: Delivers crisp text and solid monochrome graphics with reliable toner fusion, helping your documents look sharp on every page and every copy, page after page.
- Durable performance for high-volume use: Built to handle steady workloads, the 110V fuser reduces warping and toner misalignment, supporting dependable daily output even during peak print runs.
- Efficient warm-up and fast start-up: Designed for quick heating and stable fusing temperatures, minimizing wait times and delivering ready-to-print pages sooner, which saves time and improves productivity.
- Easy replacement and downtime reduction: A straightforward installation that minimizes service calls, keeps maintenance simple, and returns your printer to operation quickly so you stay on schedule.
Technical Details of Dell 110V Fuser for Dell B2360d/ B2360dn/ B3460dn/ B3465dn/ B3465dnf
- Product type: Fuser assembly for laser printing systems
- Voltage: 110V electrical rating optimized for compatible Dell printers
- Compatibility: Dell B2360d, B2360dn, B3460dn, B3465dn, B3465dnf
- Function: Fusing unit responsible for permanently bonding toner to paper through heat and pressure
- Print quality impact: Supports consistent page yield with sharp black text and clean halftones
- Maintenance note: Replacing a worn fuser helps prevent ghosting, smudging, or mis-registration on pages
- Warranty and support: Provided as part of standard Dell replacement parts programs where applicable
how to install Dell 110V Fuser
Replacing the Dell 110V fuser is a straightforward maintenance task that you can perform with basic tools and careful handling. Follow these steps to ensure a safe and successful installation that preserves print quality and protects your printer:
- Power down and unplug: Turn off the printer and disconnect it from the power source to prevent any electrical risk while you work.
- Access the fuser assembly: Open the front cover and locate the old fuser unit. Remove any panels or securing screws as required by your model’s service manual.
- Remove the old fuser: Gently disconnect any electrical connectors, then slide the worn fuser out of its mounting. Handle the component with care to avoid damage to adjacent parts.
- Install the new fuser: Align the new 110V fuser with the guides and slide it into place. Reattach any connectors and secure the unit with screws, ensuring it sits firmly and level.
- Reassemble and reset: Close all covers, reconnect power, and turn the printer back on. If prompted, perform any required reset or calibration routines to optimize the new fuser’s performance.
- Test print for confirmation: Run a few test pages to verify even fusing, proper alignment, and consistent toner adhesion across the print run.
Frequently asked questions
-
Q: Is this Dell 110V Fuser compatible with my printer?
A: Yes, it is designed for Dell B2360d, B2360dn, B3460dn, B3465dn, and B3465dnf laser printers. If your device falls outside these models, this fuser may not fit or perform as intended. -
Q: Can I replace the fuser myself, or should I hire a technician?
A: Many users successfully replace the fuser themselves with basic tools and careful handling. The process is straightforward and guided by the printer’s service manual. If you’re uncomfortable with internal components, a certified technician can perform the replacement. -
Q: Will replacing the fuser improve print quality?
A: In most cases, yes. A fresh fuser restores proper heat and pressure, eliminating issues like ghosting, smudging, or uneven fusing, and returns text clarity and image integrity to expected levels. -
Q: How long does installation take?
A: For a typical user, installation can take 20–40 minutes, depending on your familiarity with the printer and whether any additional maintenance steps are needed. -
Q: What should I expect regarding page yield and longevity?
A: Page yield varies with print coverage, media type, and usage patterns. A new fuser generally sustains consistent performance for many thousands of pages when used under normal conditions.
Choosing a genuine Dell 110V Fuser helps protect your investment in Dell hardware and maintain a professional appearance in every printed document. The fuser is engineered to withstand the rigors of daily use and to deliver reliable fusing performance across a wide range of media types and print jobs. By replacing a worn or degraded fuser, you reduce the risk of degraded image quality and service interruptions, ensuring your team can rely on the printer for critical communications, business reports, and client-facing materials.
When shopping for a replacement fuser, consider the importance of compatibility, build quality, and the ability to restore original print fidelity. The Dell 110V Fuser is designed to meet these criteria, offering a balance of durability, ease of installation, and consistent results that help you maintain a professional standard in all printed materials. Whether you’re printing dense text documents, charts, or technical diagrams, the fuser’s performance supports clean lines, uniform toner adherence, and reliable outcomes across your entire print run.
Customer reviews
Showing - Of Reviews


