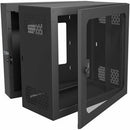
Description
Middle Atlantic CWR-12-17VD Rack Cabinet Vented Front Door (4-Rings)
Designed for professional-gradeStructured cabling projects, the Middle Atlantic CWR-12-17VD Rack Cabinet with a vented front door delivers a practical, space-saving solution for organizing, protecting, and accessing critical network gear. Whether you’re equipping a data room, broadcast environment, or AV installation, this cabinet helps you maximize floor and wall space while maintaining clean, efficient workflows. The CWR line is built to accommodate multiple patch panels and other voice and data equipment in a compact footprint, ensuring your cable management stays tidy and your equipment stays within reach. With a focus on durability, airflow, and flexible mounting options, the CWR-12-17VD makes it simple to scale your rack solutions as projects grow or configurations change.
- Structured cabling optimized: Specifically designed for structured cabling systems, enabling orderly mounting of patch panels, switches, and other voice/data hardware in a single, accessible enclosure.
- Versatile equipment mounting: A flexible system capable of holding multiple patch panels and assorted equipment, ideal for environments where space is at a premium and organization is essential.
- Space-saving design: Compact footprint that reduces floor and wall usage while still delivering robust 19-inch rack compatibility for standard components.
- Efficient cooling and airflow: Vented front door promotes airflow through the cabinet, assisting in heat management and helping to prolong the life of mounted equipment.
- Durable, mission-ready construction: Built from sturdy materials to withstand demanding installation environments, delivering reliable performance and long-term value.
Technical Details of Middle Atlantic CWR-12-17VD Rack Cabinet Vented Front Door (4-Rings)
- Product type: Rack cabinet with vented front door
- Front door: Vented for airflow and cooling
- Mounting compatibility: Designed to accept standard 19-inch rack equipment and patch panels
- Enclosure design: Structured to maximize space efficiency and support organized cabling
- Model designation: CWR-12-17VD Rack Cabinet Vented Front Door (4-Rings)
- Intended use: Ideal for environments where floor and wall space are constrained but equipment needs quick access
How to install Middle Atlantic CWR-12-17VD Rack Cabinet Vented Front Door (4-Rings)
Follow these general steps to install the CWR-12-17VD in a suitable space. Always refer to manufacturer guidelines for exact mounting hardware and safety recommendations specific to your installation site.
1) Plan your layout: Begin by surveying the room or cabinet location. Determine an optimal height, depth, and accessibility for patch panels, switches, and power distribution. Consider airflow requirements and cable management routing so that air can circulate freely through the vented front door.
2) Prepare the mounting area: Ensure the wall or floor surface is sturdy enough to support the cabinet and its contents. If mounting to a wall, locate studs or use appropriate anchors recommended for your wall type. If floor-standing, position the cabinet in a location with convenient access to power outlets and network cabling.
3) Install mounting rails: Attach the internal 19-inch mounting rails or rails specified for the cabinet, aligning them to the desired rack unit (U) positions. Make sure rails are level and firmly fastened to ensure safe mounting of heavy equipment.
4) Mount equipment: Start with heavier, higher-pran-load devices near the bottom to maintain stability. Secure patch panels, switches, and other components to the rails using the provided screws or hardware. Leave space for cable management panels and future expansion where possible.
5) Manage cables: Route inbound and outbound cables through appropriate cable management channels. Use tie wraps or Velcro straps to create neat bundles and minimize bend radii. Label cables for quick identification during maintenance or audits.
6) Attach the vented front door: If your cabinet design requires the door installation after equipment mounting, carefully align hinges and secure the door to the cabinet frame. Ensure the door closes smoothly and that ventilation openings remain unobstructed.
7) Final checks and testing: Verify door operation, cable accessibility, and airflow. Confirm that all equipment powers on correctly and that there is no excessive heat buildup in the cabinet. Perform a quick functional test of patch panels and connectivity to ensure everything is wired properly.
8) Documentation and maintenance: Keep a simple inventory of installed devices, patch panels, and cable routes. Regularly inspect door seals, rails, and cable ties to maintain a clean, efficient system. A well-documented rack simplifies future upgrades and service calls.
Frequently asked questions
-
Q: What is the purpose of the vented front door on this rack cabinet?
A: The vented front door improves airflow through the cabinet, helping to dissipate heat generated by mounted equipment and maintain stable operating temperatures for network and AV gear. -
Q: Can I mount standard 19-inch equipment inside the CWR-12-17VD?
A: Yes. The cabinet is designed to accept standard 19-inch rack-mount equipment such as patch panels, switches, and other voice/data components, making it compatible with common IT and AV hardware. -
Q: Is this cabinet suitable for tight spaces or wall installations?
A: The CWR-12-17VD is designed with space efficiency in mind, offering a compact footprint that helps maximize floor and wall space in constrained environments while still providing organized access to gear. -
Q: How should I approach cable management in this cabinet?
A: Plan a clear routing path for incoming and outgoing cables, use appropriate cable managers, and label cables for quick identification. Keeping cables neatly organized reduces heat buildup and simplifies maintenance. -
Q: Are there any installation tips to prolong the life of the equipment?
A: Ensure proper airflow, avoid overloading the cabinet, secure all devices firmly to the rails, and conduct periodic inspections for dust buildup or loose connections to maintain performance and longevity.
Customer reviews
Showing - Of Reviews


