Description
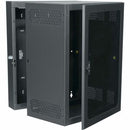
Middle Atlantic CWR-18-32PD: 18U Swinging Wall Mounted Rack, 32" Depth
The Middle Atlantic CWR-18-32PD is purpose-built for high-density, space-conscious installations where every square inch counts. Designed for structured cabling applications, this 18U wall-mounted rack delivers robust strength, effortless serviceability, and prime front-to-back access that makes routine maintenance and system upgrades painless. With a generous 32-inch depth, it accommodates a broad range of 19-inch rack-mount equipment—from network switches and patch panels to power distribution units and AV gear—while keeping cabling organized and out of the way. Ideal for data centers, server rooms, telecommunications closets, and professional AV setups, the CWR-18-32PD helps you achieve a clean, scalable, and standards-compliant rack environment in compact spaces.
- Swing-out wall-mounted design provides full front and rear access, enabling easy installation, cable management, and quick equipment swaps without moving the rack from the wall.
- 18U capacity offers flexible layout options for switches, patch panels, UPS units, media servers, routers, and other 19" equipment in a single, tidy enclosure.
- 32-inch depth accommodates deeper devices and dense cabling runs, while maintaining a narrow wall footprint to maximize usable room space in data centers and network closets.
- Welded steel construction with a durable powder-coated finish delivers long-term rigidity and resistance to daily wear, ensuring reliability in demanding environments.
- Standard 19-inch rack rails, lockable front door, and integrated cable management features streamline deployment, security, airflow, and cable routing for clean, professional installations.
Technical Details of Middle Atlantic CWR-18-32PD
- Model: CWR-18-32PD
- Series: CWR
- Type: Swinging wall-mounted rack cabinet
- Rack Units: 18U
- Depth: 32 inches
- Width: 19 inches (standard EIA 19-inch rack)
- Construction: Welded steel
- Finish: Powder-coated for durability and corrosion resistance
- Front Door: Locking, perforated steel door for airflow and security
- Panels: Vented sides to support airflow and equipment cooling
- Access: Full front and rear access via swing-out mechanism
- Rails: Standard 19" rack rails (compatible with most 19" equipment and accessories)
- Cable Management: Integrated rear cable channels and pass-through openings to keep cables tidy and protected
- Mounting: Wall-mounted with secure hardware for reliable installation in restricted spaces
How to install Middle Atlantic CWR-18-32PD
Installing a CWR-18-32PD wall-mounted rack is a straightforward process when you follow careful planning and precise mounting. Start by assessing your space, wall structure, and ventilation needs to ensure optimal airflow and serviceability. This rack is designed to sit flush against a solid wall, so confirm there is sufficient clearance for the swing-out panel and for cable routing. Gather the necessary tools and included mounting hardware, and verify that you have access to sturdy wall studs or a solid backing capable of supporting the combined weight of rack equipment plus cables. Proper installation not only enhances performance but also extends the life of your gear by reducing vibration and unwanted movement during operation.
- Prepare the installation area: confirm wall integrity, locate studs or solid backing, and mark the mounting points to align with the rack’s swing-out swing rails. Ensure there is adequate clearance for front door access and rear cable management.
- Attach the mounting frame and rails: using the included hardware, secure the CWR-18-32PD to the wall at the designated stud locations. Use a level to ensure the rack is perfectly plumb and square, which is essential for smooth operation of the swing-out mechanism and proper door alignment.
- Verify alignment and support: double-check that all fasteners are tightened to specification and that the swing-out frame moves freely without obstruction. Confirm that the weight distribution is balanced to prevent strain on the mounting points during operation.
- Install equipment: mount your 19" devices on the rails using standard cage nuts and screws. Start with larger or heavier components toward the bottom for stability, and leave space for cables and cooling air flow. Attach patch panels, switches, and power distribution units as needed, following manufacturer guidelines for clearance and ventilation.
- Route cables and seal the enclosure: use the rear cable channels and pass-through openings to organize power and data runs. Keep power and data cables separated where possible to minimize interference. Close the front door, secure the lock, and test the swing-out mechanism to ensure full access without binding. Finally, perform a basic equipment check, verify connectivity, and confirm proper airflow through vents for cooling efficiency.
Frequently asked questions
-
Q: What is the vertical space and overall depth of the rack?
A: The cabinet provides 18U of rack space with a 32-inch depth, designed to accommodate a wide range of 19-inch equipment and provide generous rear cabling room while keeping the unit compact on the wall.
-
Q: Does the unit include rails and a locking front door?
A: Yes. It ships with standard 19-inch rack rails and a lockable front door to secure your equipment while maintaining accessibility for service and upgrades.
-
Q: Can I access equipment from the rear as well as the front?
A: Absolutely. The swinging wall-mounted design provides full front and rear access, making installation, maintenance, and cable management much easier without removing the rack from the wall.
-
Q: Is this rack suitable for data centers, network closets, and AV installations?
A: Yes. The CWR series is intended for structured cabling environments where floor and wall space are limited, delivering reliable performance for IT, networking, and professional AV gear.
-
Q: How should I approach installation to maximize airflow and accessibility?
A: Plan for clear front-door access, minimize obstructions behind the rack, and route cables through rear channels to keep the interior organized. Ensure the area remains ventilated and free of heat buildup by avoiding blocked vents and excessive cable clutter.
Customer reviews
Showing - Of Reviews


